网页3d cad中创建三维建筑墙体(网页三维cad sdk) | f2e 前端技术论坛-大发黄金版app下载
一、前言
1.本文将介绍如何使用mxcad3d来创建建筑墙体模型。该工具提供了丰富的三维建模功能和便捷的api,首先通过npm包管理器来新建测试项目并引入mxcad包,所以需要先安装node.js,里面自带了npm包管理器 以及包含在npm包管理器中的npx工具 (用于启动运行我们的测试项目),。
更多详细的教程公z号:梦想云图网页cad。
二、新建测试项目
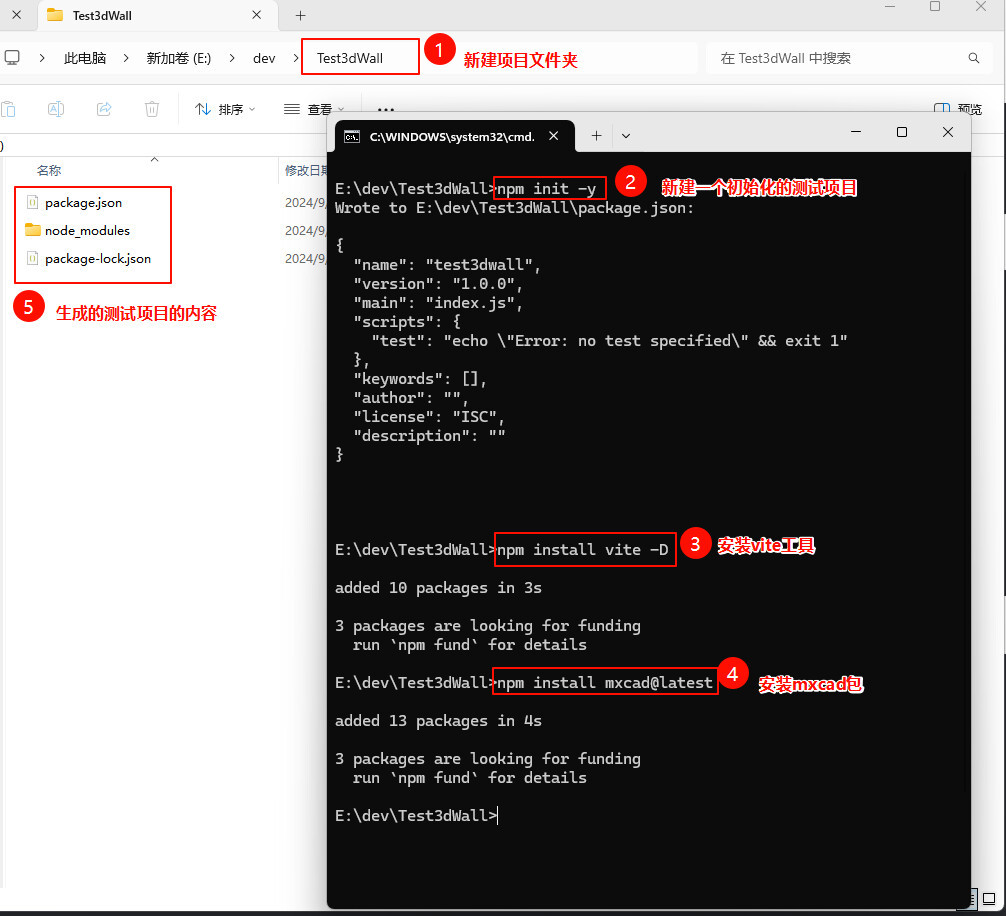
1.在合适的位置创建本次教程的测试项目文件夹test3dwall ,并在test3dwall 文件夹中打开cmd命令行工具 ,依次输入以下指令来初始化项目并引入mxcad包。新建项目的方法也可以在官方的快速入门文档中找到,地址:
依次输入以下操作命令,如下图:
npm init -y
npm install vite -d
npm install mxcad@latest
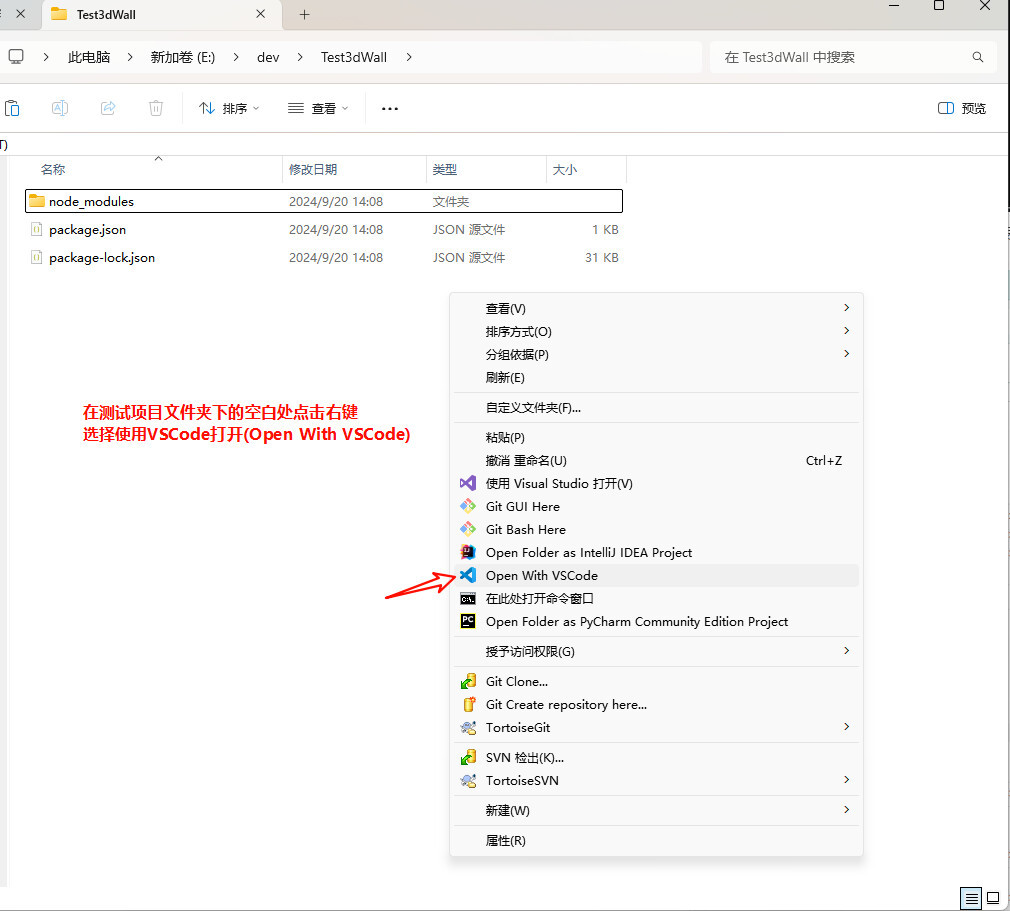
2.使用vs code打开新建的测试项目文件夹(vs code是一款好用的集成开发工具,如何安装这里不再赘述,下载地址:
3.打开项目后,在项目目录下新建一个index.html文件以及一个src目录,然后在src目录下新建一个index.ts文件 并编写最基本的代码:
index.html
<html lang="en">
<head>
    <meta charset="utf-8">
    <meta http-equiv="x-ua-compatible" content="ie=edge">
    <meta name="viewport" content="width=device-width, initial-scale=1.0">
    <title>vite use mxcadtitle>
head>
<body>
    <div style="height: 800px; overflow: hidden;"> <canvas id="mycanvas">canvas>div>
    <script type="module" src="./src/index.ts">script>
body>
html>
src/index.ts
import { mxcad3dobject } from "mxcad"
// 创建mxcad3d对象
const mxcad3d = new mxcad3dobject()
// 初始化mxcad3d对象
mxcad3d.create({
    // canvas元素的css选择器字符串(示例中是id选择器),或canvas元素对象
    canvas: "#mycanvas",
    // 获取加载wasm相关文件(wasm/js/worker.js)路径位置
    locatefile: (filename)=> new url(`/node_modules/mxcad/dist/wasm/3d/${filename}`, import.meta.url).href,
})
// 初始化完成
mxcad3d.on("init", ()=>{
    console.log("初始化完成");
});
三、运行测试
1.新建终端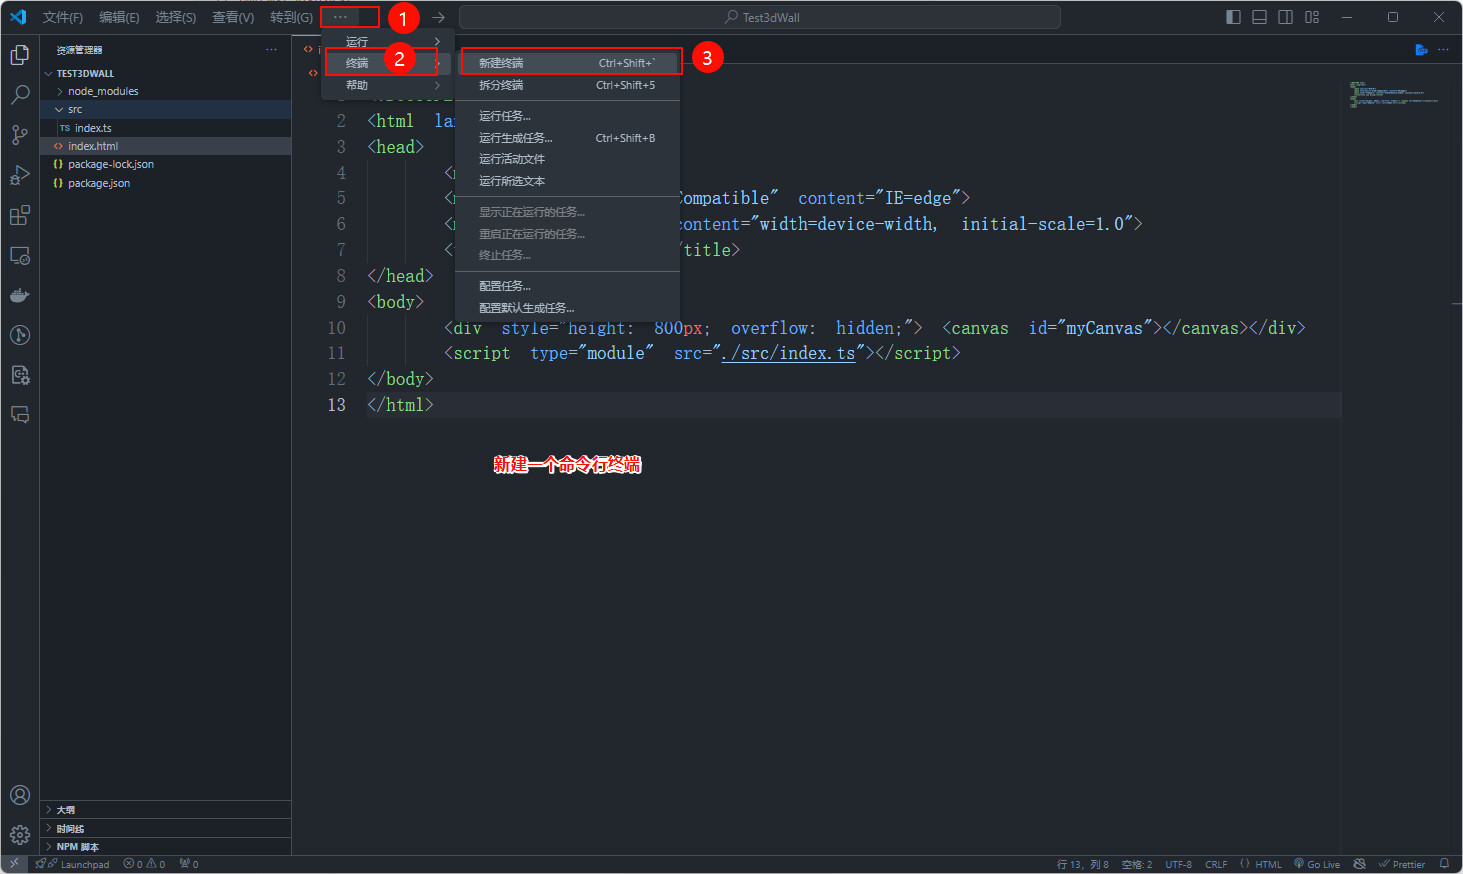
2.开启服务
3.打开网页,查看效果
四、编写绘制建筑墙体的代码
1.墙体的二维平面设计图:
2.index.html中添加一个按钮(以下是index.html完整代码)
<html lang="en">
<head>
    <meta charset="utf-8">
    <meta http-equiv="x-ua-compatible" content="ie=edge">
    <meta name="viewport" content="width=device-width, initial-scale=1.0">
    <title>vite use mxcadtitle>
head>
<body>
    <div style="height: 800px; overflow: hidden;"> <canvas id="mycanvas">canvas>div>
    <script type="module" src="./src/index.ts">script>
    <button>绘制建筑墙体button>
body>
html>
3.src/index.ts中添加绘制墙体的代码,给按钮添加点击事件来触发绘制墙体的代码执行,以下是src/index.ts完整代码:
import { mxcad3dobject, mx3dgepoint, mx3dmkpolygon, mx3dmkface, mx3dmkprism, mx3dgevec, mx3dgecolor, mdge } from "mxcad"
// 创建mxcad3d对象
const mxcad3d = new mxcad3dobject()
// 初始化mxcad3d对象
mxcad3d.create({
    // canvas元素的css选择器字符串(示例中是id选择器),或canvas元素对象
    canvas: "#mycanvas",
    // 获取加载wasm相关文件(wasm/js/worker.js)路径位置
    locatefile: (filename)=> new url(`/node_modules/mxcad/dist/wasm/3d/${filename}`, import.meta.url).href,
})
// 初始化完成
mxcad3d.on("init", ()=>{
    console.log("初始化完成");
});
function fundrawwall(){
  // 外墙轮廓
  const walloutterpts: mx3dgepoint[] = [];
  walloutterpts.push(new mx3dgepoint(0, 0, 0));
  walloutterpts.push(new mx3dgepoint(0, 4480, 0));
  walloutterpts.push(new mx3dgepoint(5480, 4480, 0));
  walloutterpts.push(new mx3dgepoint(5480, 0, 0));
  const walloutterpolygon = new mx3dmkpolygon();
  walloutterpts.foreach((pt) => {
    walloutterpolygon.add(pt);
  });
  walloutterpolygon.close();
  const walloutterwire = walloutterpolygon.wire();
  const wallouttermkface = new mx3dmkface(walloutterwire);
  const walloutterface = wallouttermkface.face();
  // 内墙轮廓
  const wallinnerpts: mx3dgepoint[] = [];
  wallinnerpts.push(new mx3dgepoint(240, 240, 0));
  wallinnerpts.push(new mx3dgepoint(240, 4240, 0));
  wallinnerpts.push(new mx3dgepoint(5240, 4240, 0));
  wallinnerpts.push(new mx3dgepoint(5240, 240, 0));
  const wallinnerpolygon = new mx3dmkpolygon();
  wallinnerpts.foreach((pt) => {
    wallinnerpolygon.add(pt);
  });
  wallinnerpolygon.close();
  const wallinnerwire = wallinnerpolygon.wire();
  const wallinnermkface = new mx3dmkface(wallinnerwire);
  const wallinnerface = wallinnermkface.face();
  // 墙体截面
  const wallface = walloutterface.cut(wallinnerface);
  // 拉伸墙体
  const wallmkprism = new mx3dmkprism(wallface, new mx3dgevec(0, 0, 3000));
  let wall = wallmkprism.shape();
  // 开窗洞
  const winpts: mx3dgepoint[] = [];
  winpts.push(new mx3dgepoint(1990, 4240, 1000));
  winpts.push(new mx3dgepoint(1990, 4240, 2200));
  winpts.push(new mx3dgepoint(3490, 4240, 2200));
  winpts.push(new mx3dgepoint(3490, 4240, 1000));
  const winpolygon = new mx3dmkpolygon();
  winpts.foreach((pt) => {
    winpolygon.add(pt);
  });
  winpolygon.close();
  const winwire = winpolygon.wire();
  const winmkface = new mx3dmkface(winwire);
  const winface = winmkface.face();
  const winmkprism = new mx3dmkprism(winface, new mx3dgevec(0, 240, 0));
  const win = winmkprism.shape();
  // 开门洞
  const doorpts: mx3dgepoint[] = [];
  doorpts.push(new mx3dgepoint(5240, 1160, 0));
  doorpts.push(new mx3dgepoint(5240, 1160, 2000));
  doorpts.push(new mx3dgepoint(5240, 360, 2000));
  doorpts.push(new mx3dgepoint(5240, 360, 0));
  const doorpolygon = new mx3dmkpolygon();
  doorpts.foreach((pt) => {
    doorpolygon.add(pt);
  });
  doorpolygon.close();
  const doorwire = doorpolygon.wire();
  const doormkface = new mx3dmkface(doorwire);
  const doorface = doormkface.face();
  const doormkprism = new mx3dmkprism(doorface, new mx3dgevec(240, 0, 0));
  const door = doormkprism.shape();
  wall = wall.cut(win).cut(door);
  // 准备一个棕色
  const browncolor = new mx3dgecolor(mdge.mxnameofcolor.color_noc_brown);
  // 先清除视图中的模型
  mxcad3d.removeall();
  // 获取视图文档
  const doc = mxcad3d.getdocument();
  // 文档中创建一个标签用于存储墙体形状
  const walllabel = doc.addshapelabel();
  // 墙体形状放入文档标签中
  walllabel.setshape(wall);
  // 给墙体设置为棕色
  walllabel.setcolor(browncolor);
  // 更新显示视图
  mxcad3d.update();
}
// 给button添加点击事件,点击后调用drawroundrectpipe函数,进行圆角方管的绘制
// 立即执行函数
(function addeventtobutton(){
  const btn = document.queryselector("button");
  if (btn) {
    btn.addeventlistener("click", () => {
      fundrawwall();
    });
  }
})()
4.重新查看运行效果
5.本次教程最后完成的完整测试项目压缩包下载地址为:。
压缩包下载解压后需要在项目目录下打开cmd命令行,然后在命令行中执行npm install来安装依赖,然后再按照本教程中的方式来运行项目查看效果。
本作品采用《cc 协议》,转载必须注明作者和本文链接